> ## Documentation Index
> Fetch the complete documentation index at: https://docs.flatpeak.com/llms.txt
> Use this file to discover all available pages before exploring further.
# Integrate tariff connection into your app
Flatpeak Connect is the customer-facing entry point to the Flatpeak platform. It allows your app to enable customers to link their electricity tariff, so your backend can access energy prices.
New to Flatpeak? Start with the Quickstart guide before continuing.
Connect can be integrated in two main ways:
* Clone our reference implementation and embed it into your app via **WebView**.
* Build the necessary pages in your app using preferred framework and the Flatpeak **API** (recommended).
Use this guide to integrate Flatpeak’s Connect into your app by embedding it via WebView.
 Clone our repo and install the required dependencies
```bash theme={"system"}
git clone https://github.com/flat-peak/flatpeak-connect-web.git
cd flatpeak-connect-web
npm install
```
You will need to host the web app on your servers for production.
For now, you can simply run it on your computer.
```bash theme={"system"}
export FLATPEAK_CONNECT_URL=https://connect.flatpeak.com
```
Ensure this is set correctly for your environment. Adjust for Windows-based shells if needed.
```bash theme={"system"}
npm run dev
```
A local preview will be available at [http://localhost:7070](http://localhost:7070).
Clone our repo and install the required dependencies
```bash theme={"system"}
git clone https://github.com/flat-peak/flatpeak-connect-web.git
cd flatpeak-connect-web
npm install
```
You will need to host the web app on your servers for production.
For now, you can simply run it on your computer.
```bash theme={"system"}
export FLATPEAK_CONNECT_URL=https://connect.flatpeak.com
```
Ensure this is set correctly for your environment. Adjust for Windows-based shells if needed.
```bash theme={"system"}
npm run dev
```
A local preview will be available at [http://localhost:7070](http://localhost:7070).
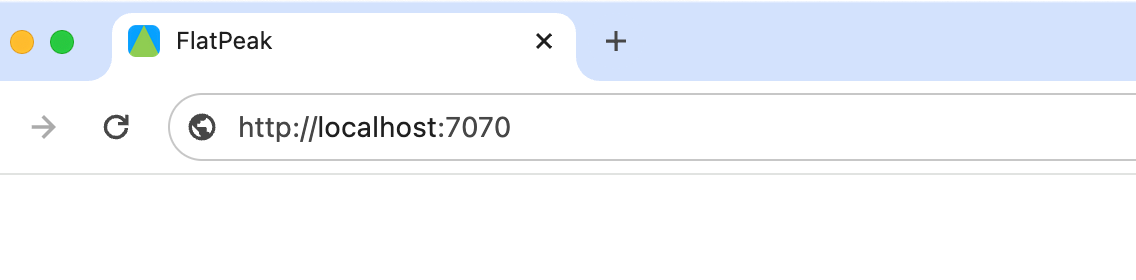 You will see an error. This is because you have not provided a Connect token. Ignore the error for now and continue following this guide.
Your system needs to be notified when a customer completes the Connect flow so it can start retrieving their electricity prices and using other energy intelligence endpoints.
You will see an error. This is because you have not provided a Connect token. Ignore the error for now and continue following this guide.
Your system needs to be notified when a customer completes the Connect flow so it can start retrieving their electricity prices and using other energy intelligence endpoints.
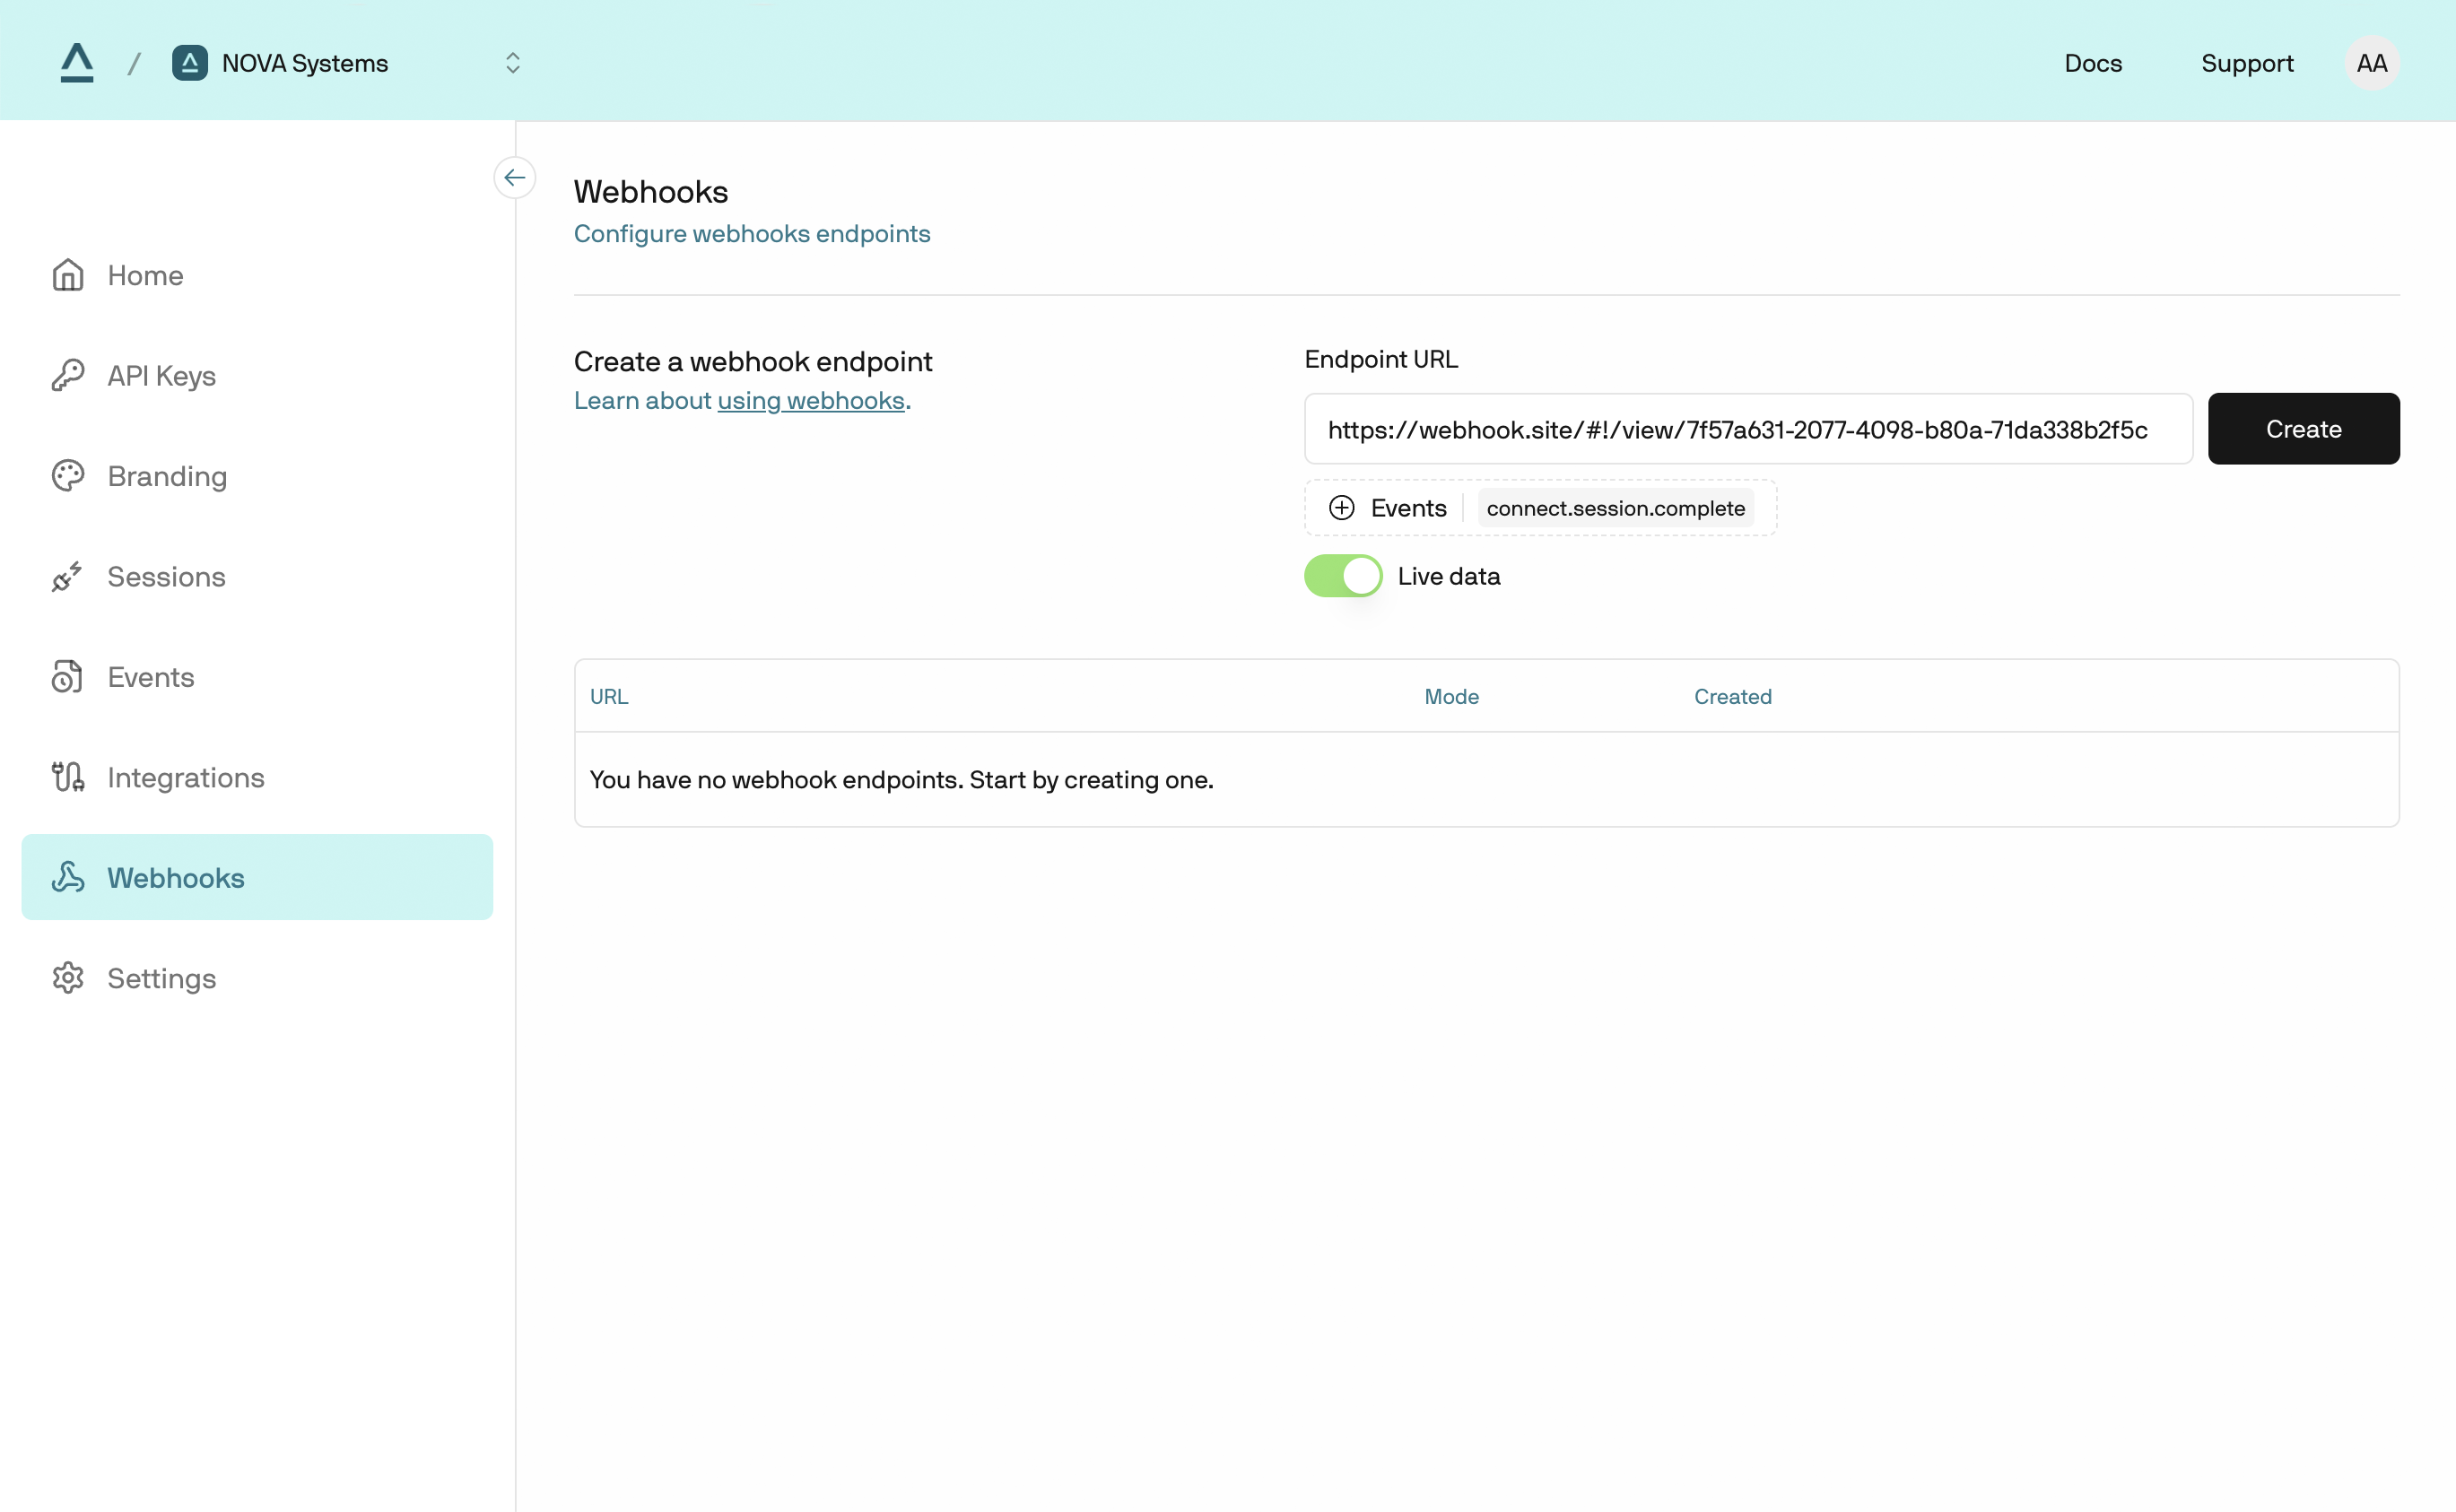 Subscribe to `connect_session.complete` events via a webhook:
1. Open [Flatpeak Dashboard](https://dashboard.flatpeak.com/)
2. Select **Webhooks** in the main menu
3. In **Endpoint URL**, enter the address where you want to receive webhook events
4. Click **Events** and select `connect_session.complete`
5. Set the selector to **Live data** or **Test data**, depending on API key you are using
6. Click **Create** to start sending events to your webhook destination
Single-use Connect tokens enable secure access to Connect API endpoints while keeping API keys away from the frontend.
1. First, authenticate to the API by calling [authentication](/api-reference/anode/authentication) endpoint.
2. Next, call the [create-connect-token](/api-reference/anode/connect/create-a-connect-token) endpoint to create a `connect_token`.
```json Request example theme={"system"}
curl --request POST \
--url https://api.flatpeak.com/connect/token \
--header 'Authorization: Bearer ' \
--header 'Content-Type: application/json' \
--data '{
"connect_url": "",
"callback_url": "",
"postal_address": {
"address_line1": "1-3",
"address_line2": "Strand",
"city": "London",
"state": "Greater London",
"post_code": "WC2N 5EH",
"country_code": "GB"
}
}'
```
```json Response example theme={"system"}
{
"connect_token": "cot_6587fa4362341be5b524de3b",
"expires_in": "86400"
}
```
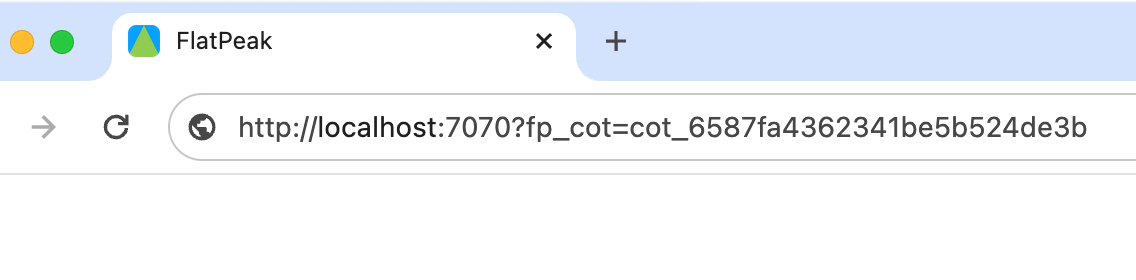
In your browser, open: `http://localhost:7070?fp_cot=cot_***`, replacing `cot_***` with the `connect_token`:
Subscribe to `connect_session.complete` events via a webhook:
1. Open [Flatpeak Dashboard](https://dashboard.flatpeak.com/)
2. Select **Webhooks** in the main menu
3. In **Endpoint URL**, enter the address where you want to receive webhook events
4. Click **Events** and select `connect_session.complete`
5. Set the selector to **Live data** or **Test data**, depending on API key you are using
6. Click **Create** to start sending events to your webhook destination
Single-use Connect tokens enable secure access to Connect API endpoints while keeping API keys away from the frontend.
1. First, authenticate to the API by calling [authentication](/api-reference/anode/authentication) endpoint.
2. Next, call the [create-connect-token](/api-reference/anode/connect/create-a-connect-token) endpoint to create a `connect_token`.
```json Request example theme={"system"}
curl --request POST \
--url https://api.flatpeak.com/connect/token \
--header 'Authorization: Bearer ' \
--header 'Content-Type: application/json' \
--data '{
"connect_url": "",
"callback_url": "",
"postal_address": {
"address_line1": "1-3",
"address_line2": "Strand",
"city": "London",
"state": "Greater London",
"post_code": "WC2N 5EH",
"country_code": "GB"
}
}'
```
```json Response example theme={"system"}
{
"connect_token": "cot_6587fa4362341be5b524de3b",
"expires_in": "86400"
}
```
In your browser, open: `http://localhost:7070?fp_cot=cot_***`, replacing `cot_***` with the `connect_token`:
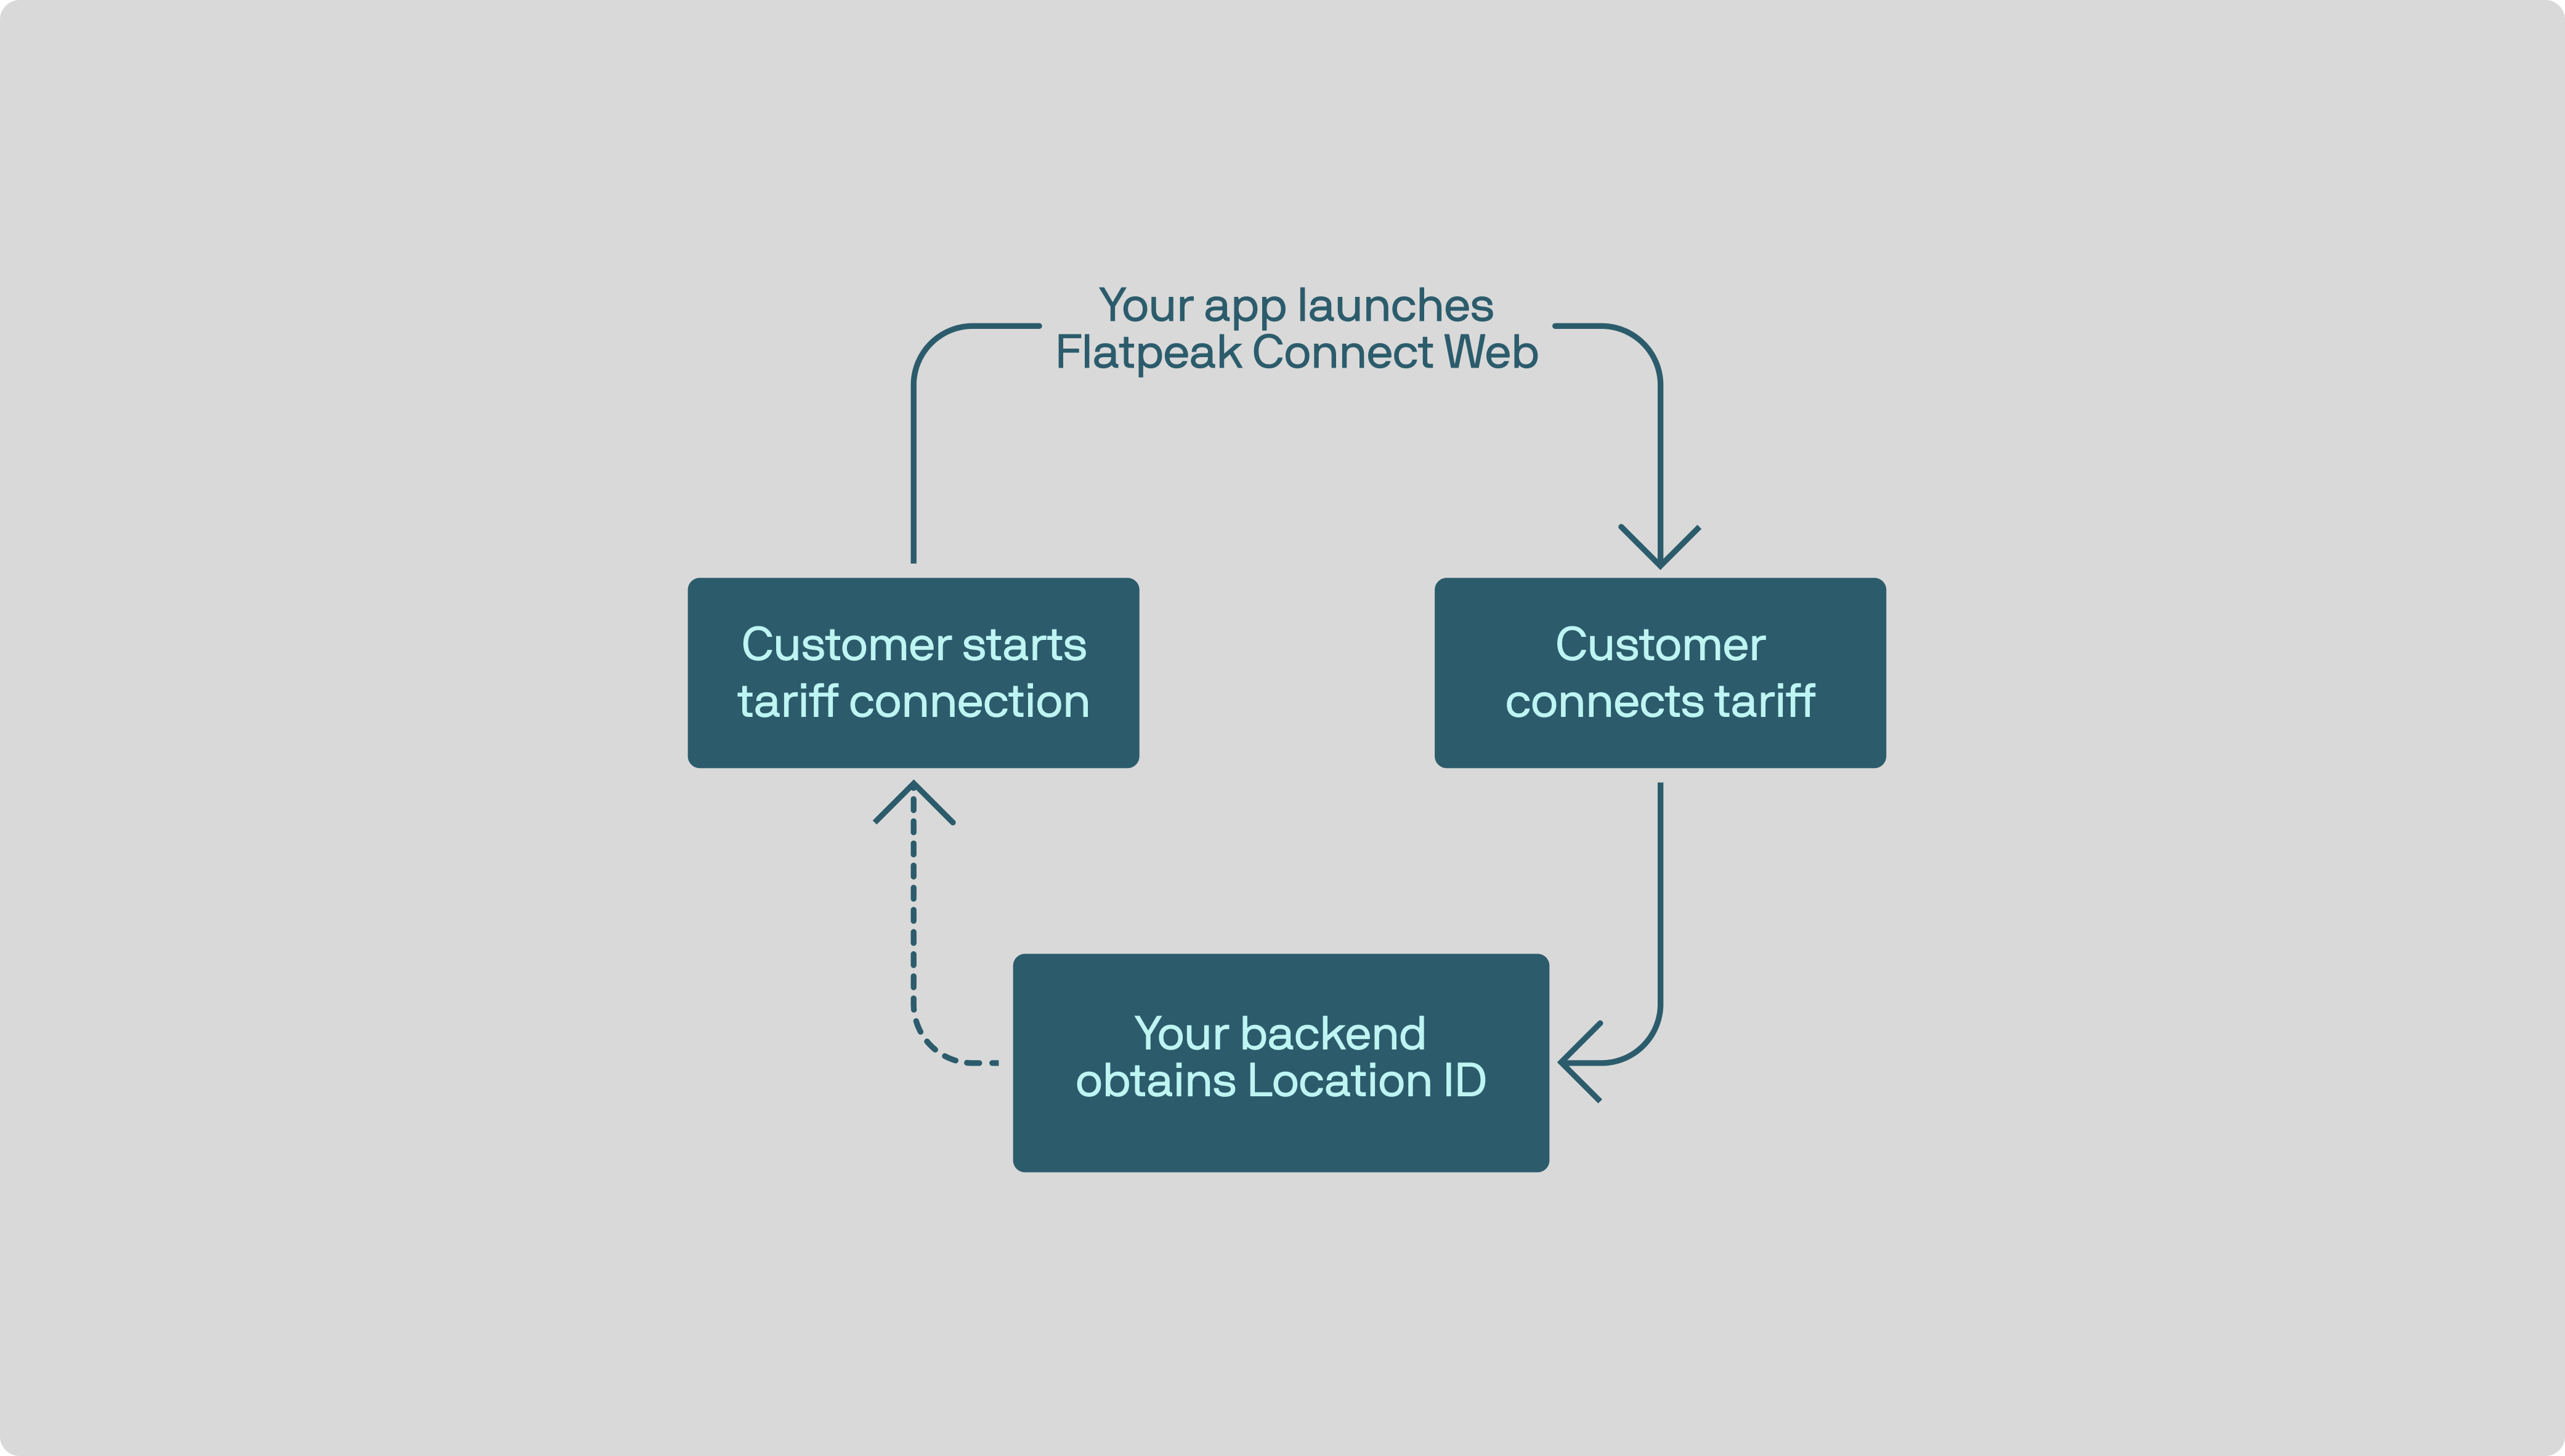
 In production, customers will launch Connect directly from your app. Your backend should create Connect tokens on demand and pass them to the app.
Connect guides customers through a short flow to share their tariff. It automatically chooses the best method based on provider APIs, data-sharing rules, and usage patterns across Flatpeak.
In production, customers will launch Connect directly from your app. Your backend should create Connect tokens on demand and pass them to the app.
Connect guides customers through a short flow to share their tariff. It automatically chooses the best method based on provider APIs, data-sharing rules, and usage patterns across Flatpeak.
 To test Connect flow, use your own account from any supported energy provider. If you don’t have access to one, contact [support](https://dashboard.flatpeak.com/#support) for a test account.
Learn more about [Connect flow architecture](/guides/connect/architecture), [markets](/guides/sources/market-rates) and [provider integrations coverage](/guides/sources/providers).
1. When the customer successfully completes a session with Connect, you will receive a webhook to the destination you specified earlier:
```json Example webhook payload theme={"system"}
{
"id": "evt_66167787c1652b3fbeba5f01",
"object": "event",
"type": "connect_session.complete",
"data": {
"id": "cot_6587fa4362341be5b524de3b",
"object": "connect_token",
"location_id": "loc_641b90b758fb8e6293716e40",
"price_available": true
}
}
```
2. The `location_id` is a permanent identifier for your customer’s address. Store it in your database as a reference to the customer’s address. You will use it to fetch electricity prices and access other energy intelligence endpoints. You can also re-request this ID by calling [retrieve-connect-token](/api-reference/anode/connect/retrieve-a-connect-token) endpoint.
```bash Request example theme={"system"}
curl --request GET \
--url 'https://api.flatpeak.com/connect/token?connect_token=cot_6587fa4362341be5b524de3b' \
--header 'Authorization: Bearer '
```
```json Response example theme={"system"}
{
"id": "cot_6587fa4362341be5b524de3b",
"object": "connect_token",
"location_id": "loc_641b90b758fb8e6293716e40"
}
```
To enable customers to modify or remove their tariff connection, see the [Tariff Settings Page](/guides/connect/settings-page) guide. It explains how to build UI controls that let them view, reconnect, disconnect, or adjust their tariff — including connecting an export tariff.
In short, you’ll need to implement passing the `location_id` when creating Connect tokens. This will launch Connect in the context of the existing tariff connection for that location.
### Tip for embedding
When embedding Connect in your app, launch it in a modal or bottom sheet ([iOS](https://developer.apple.com/design/human-interface-guidelines/sheets)/[Android](https://m3.material.io/components/bottom-sheets/guidelines)) to prevent layout issues—especially on devices with notches or cutouts.
To test Connect flow, use your own account from any supported energy provider. If you don’t have access to one, contact [support](https://dashboard.flatpeak.com/#support) for a test account.
Learn more about [Connect flow architecture](/guides/connect/architecture), [markets](/guides/sources/market-rates) and [provider integrations coverage](/guides/sources/providers).
1. When the customer successfully completes a session with Connect, you will receive a webhook to the destination you specified earlier:
```json Example webhook payload theme={"system"}
{
"id": "evt_66167787c1652b3fbeba5f01",
"object": "event",
"type": "connect_session.complete",
"data": {
"id": "cot_6587fa4362341be5b524de3b",
"object": "connect_token",
"location_id": "loc_641b90b758fb8e6293716e40",
"price_available": true
}
}
```
2. The `location_id` is a permanent identifier for your customer’s address. Store it in your database as a reference to the customer’s address. You will use it to fetch electricity prices and access other energy intelligence endpoints. You can also re-request this ID by calling [retrieve-connect-token](/api-reference/anode/connect/retrieve-a-connect-token) endpoint.
```bash Request example theme={"system"}
curl --request GET \
--url 'https://api.flatpeak.com/connect/token?connect_token=cot_6587fa4362341be5b524de3b' \
--header 'Authorization: Bearer '
```
```json Response example theme={"system"}
{
"id": "cot_6587fa4362341be5b524de3b",
"object": "connect_token",
"location_id": "loc_641b90b758fb8e6293716e40"
}
```
To enable customers to modify or remove their tariff connection, see the [Tariff Settings Page](/guides/connect/settings-page) guide. It explains how to build UI controls that let them view, reconnect, disconnect, or adjust their tariff — including connecting an export tariff.
In short, you’ll need to implement passing the `location_id` when creating Connect tokens. This will launch Connect in the context of the existing tariff connection for that location.
### Tip for embedding
When embedding Connect in your app, launch it in a modal or bottom sheet ([iOS](https://developer.apple.com/design/human-interface-guidelines/sheets)/[Android](https://m3.material.io/components/bottom-sheets/guidelines)) to prevent layout issues—especially on devices with notches or cutouts.
 This will keep the interface clean and ensure all elements remain visible.
Use this guide to integrate Flatpeak’s Connect into your app using your preferred framework.
This will keep the interface clean and ensure all elements remain visible.
Use this guide to integrate Flatpeak’s Connect into your app using your preferred framework.
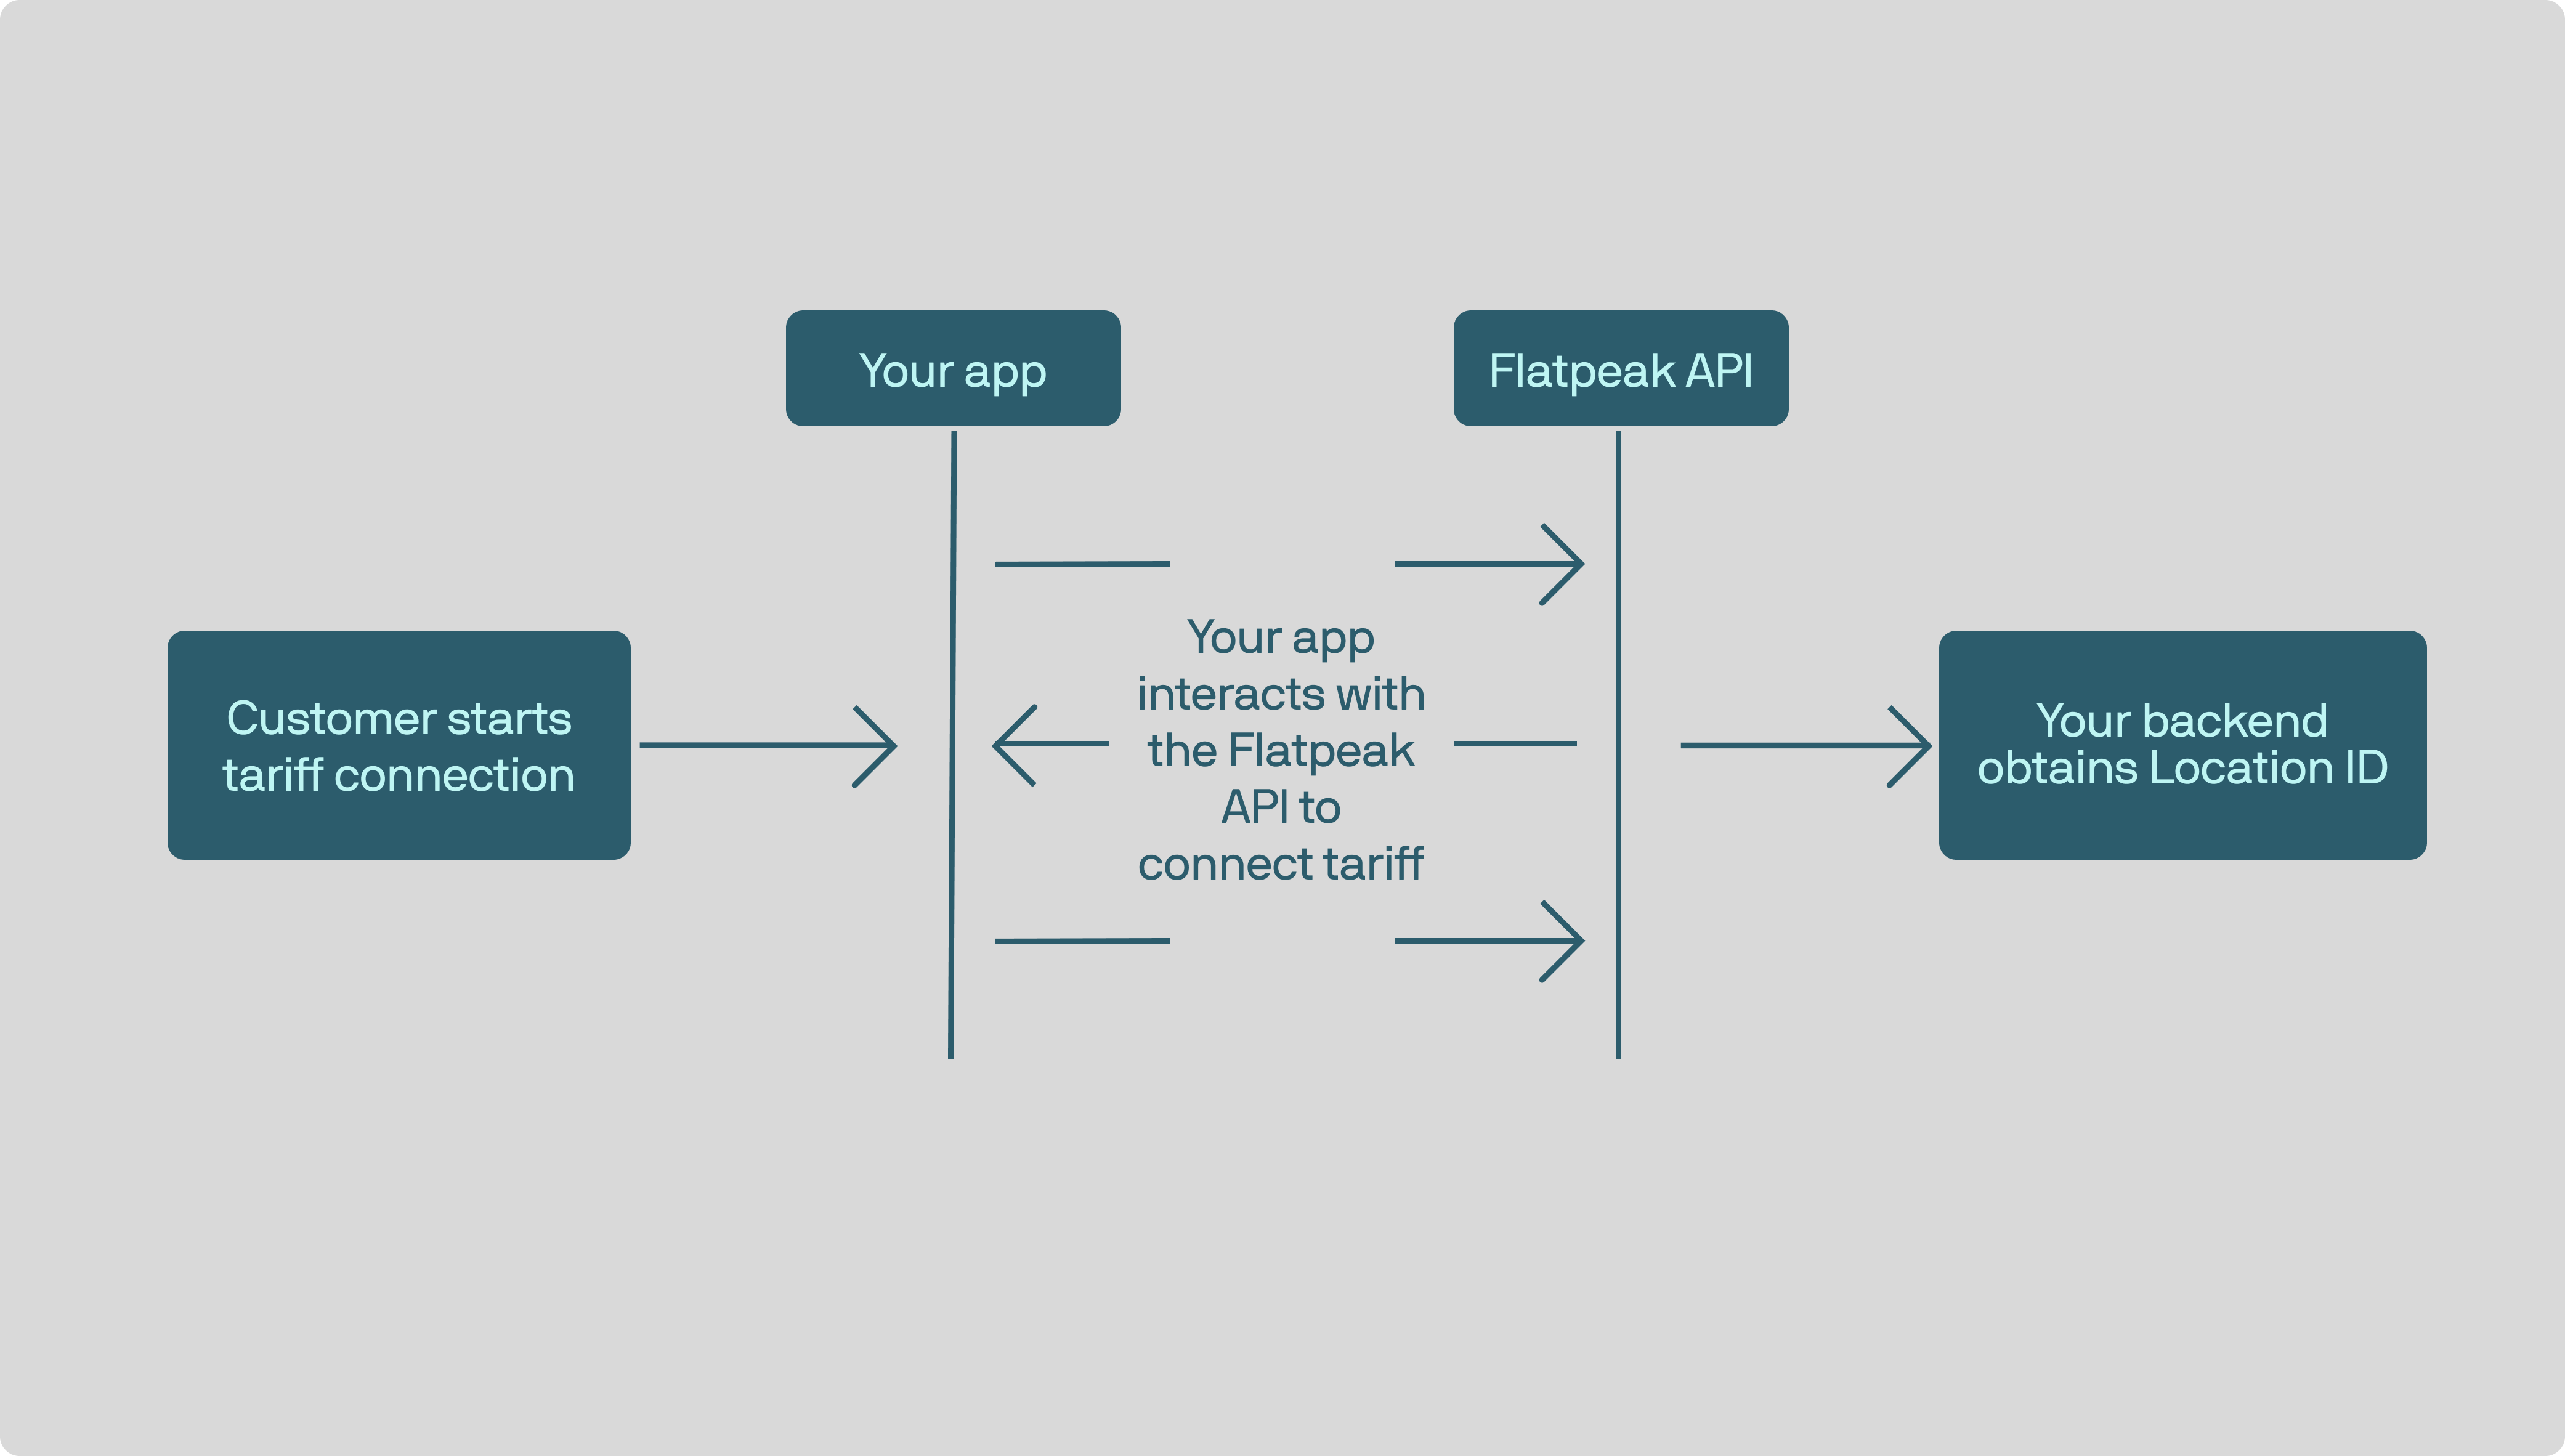 Connect uses JSON-based session conversation, rather than standard REST request/response.
Make sure to complete [Quickstart](/quickstart) before following this guide. It provides **necessary** context on how the Connect works and what to expect during this integration.
Your system needs to be notified when a customer completes the Connect flow so it can start retrieving their electricity prices and interacting with other energy intelligence endpoints.
To do this, subscribe to a webhook that delivers `connect_session.complete` events:
1. Open [Flatpeak Dashboard](https://dashboard.flatpeak.com/)
2. Select **Webhooks** in the main menu
3. In **Endpoint URL**, enter the address where you want to receive webhook events
4. Click **Events** and select `connect_session.complete`
5. Set the selector to **Live data** or **Test data**, depending on API key you are using
6. Click **Create** to start sending events to your webhook destination
Single-use Connect tokens provide secure access to Connect API endpoints while keeping API keys away from the frontend.
1. First, authenticate to the API by calling [authentication](/api-reference/anode/authentication) endpoint.
2. Next, call the [create-connect-token](/api-reference/anode/connect/create-a-connect-token) endpoint to create a `connect_token`.
```json Request example theme={"system"}
curl --request POST \
--url https://api.flatpeak.com/connect/token \
--header 'Authorization: Bearer ' \
--header 'Content-Type: application/json' \
--data '{
"connect_url": "",
"callback_url": "",
"postal_address": {
"address_line1": "1-3",
"address_line2": "Strand",
"city": "London",
"state": "Greater London",
"post_code": "WC2N 5EH",
"country_code": "GB"
}
}'
```
```json Response example theme={"system"}
{
"connect_token": "cot_6587fa4362341be5b524de3b",
"expires_in": "86400"
}
```
Call the [start-connect-session](/api-reference/anode/connect/start-a-connect-session) endpoint to begin the Connect flow.
The response will be one of the predefined pages listed under **Connect** > **Required pages** in the API Reference.
Your app must provide a customer action that starts the Connect flow when they want to connect their tariff. It must also support handling **all** required pages.
For guidance on implementing tariff controls in your app, see the [Tariff Settings Page](/guides/connect/settings-page) guide.
1. When the customer successfully completes a session with Connect you will receive a webhook to the destination you specified earlier:
```json Example webhook payload theme={"system"}
{
"id": "evt_66167787c1652b3fbeba5f01",
"object": "event",
"type": "connect_session.complete",
"data": {
"id": "cot_6587fa4362341be5b524de3b",
"object": "connect_token",
"location_id": "loc_641b90b758fb8e6293716e40",
"price_available": true
}
}
```
2. The `location_id` is a permanent identifier for your customer’s address. Store it in your database as a reference to the customer’s address. You will use it to fetch electricity prices and access other energy intelligence endpoints. You can also re-request this ID by calling [retrieve-connect-token](/api-reference/anode/connect/retrieve-a-connect-token) endpoint.
```bash Request example theme={"system"}
curl --request GET \
--url 'https://api.flatpeak.com/connect/token?connect_token=cot_6587fa4362341be5b524de3b' \
--header 'Authorization: Bearer '
```
```json Response example theme={"system"}
{
"id": "cot_6587fa4362341be5b524de3b",
"object": "connect_token",
"location_id": "loc_641b90b758fb8e6293716e40"
}
```
To enable customers to modify or remove their tariff connection, see the [Tariff Settings Page](/guides/connect/settings-page) guide. It explains how to build UI controls that let them view, reconnect, disconnect, or adjust their tariff — including connecting an export tariff.
In short, you’ll need to implement passing the `location_id` when creating Connect tokens. This will launch Connect in the context of the existing tariff connection for that location.
## Next steps
Your systems can now access:
* [Energy prices](/guides/connect/retrieve-price)
* Energy [scheduling](/guides/schedule)
* Energy [cost calculation](/guides/calculate)
Connect uses JSON-based session conversation, rather than standard REST request/response.
Make sure to complete [Quickstart](/quickstart) before following this guide. It provides **necessary** context on how the Connect works and what to expect during this integration.
Your system needs to be notified when a customer completes the Connect flow so it can start retrieving their electricity prices and interacting with other energy intelligence endpoints.
To do this, subscribe to a webhook that delivers `connect_session.complete` events:
1. Open [Flatpeak Dashboard](https://dashboard.flatpeak.com/)
2. Select **Webhooks** in the main menu
3. In **Endpoint URL**, enter the address where you want to receive webhook events
4. Click **Events** and select `connect_session.complete`
5. Set the selector to **Live data** or **Test data**, depending on API key you are using
6. Click **Create** to start sending events to your webhook destination
Single-use Connect tokens provide secure access to Connect API endpoints while keeping API keys away from the frontend.
1. First, authenticate to the API by calling [authentication](/api-reference/anode/authentication) endpoint.
2. Next, call the [create-connect-token](/api-reference/anode/connect/create-a-connect-token) endpoint to create a `connect_token`.
```json Request example theme={"system"}
curl --request POST \
--url https://api.flatpeak.com/connect/token \
--header 'Authorization: Bearer ' \
--header 'Content-Type: application/json' \
--data '{
"connect_url": "",
"callback_url": "",
"postal_address": {
"address_line1": "1-3",
"address_line2": "Strand",
"city": "London",
"state": "Greater London",
"post_code": "WC2N 5EH",
"country_code": "GB"
}
}'
```
```json Response example theme={"system"}
{
"connect_token": "cot_6587fa4362341be5b524de3b",
"expires_in": "86400"
}
```
Call the [start-connect-session](/api-reference/anode/connect/start-a-connect-session) endpoint to begin the Connect flow.
The response will be one of the predefined pages listed under **Connect** > **Required pages** in the API Reference.
Your app must provide a customer action that starts the Connect flow when they want to connect their tariff. It must also support handling **all** required pages.
For guidance on implementing tariff controls in your app, see the [Tariff Settings Page](/guides/connect/settings-page) guide.
1. When the customer successfully completes a session with Connect you will receive a webhook to the destination you specified earlier:
```json Example webhook payload theme={"system"}
{
"id": "evt_66167787c1652b3fbeba5f01",
"object": "event",
"type": "connect_session.complete",
"data": {
"id": "cot_6587fa4362341be5b524de3b",
"object": "connect_token",
"location_id": "loc_641b90b758fb8e6293716e40",
"price_available": true
}
}
```
2. The `location_id` is a permanent identifier for your customer’s address. Store it in your database as a reference to the customer’s address. You will use it to fetch electricity prices and access other energy intelligence endpoints. You can also re-request this ID by calling [retrieve-connect-token](/api-reference/anode/connect/retrieve-a-connect-token) endpoint.
```bash Request example theme={"system"}
curl --request GET \
--url 'https://api.flatpeak.com/connect/token?connect_token=cot_6587fa4362341be5b524de3b' \
--header 'Authorization: Bearer '
```
```json Response example theme={"system"}
{
"id": "cot_6587fa4362341be5b524de3b",
"object": "connect_token",
"location_id": "loc_641b90b758fb8e6293716e40"
}
```
To enable customers to modify or remove their tariff connection, see the [Tariff Settings Page](/guides/connect/settings-page) guide. It explains how to build UI controls that let them view, reconnect, disconnect, or adjust their tariff — including connecting an export tariff.
In short, you’ll need to implement passing the `location_id` when creating Connect tokens. This will launch Connect in the context of the existing tariff connection for that location.
## Next steps
Your systems can now access:
* [Energy prices](/guides/connect/retrieve-price)
* Energy [scheduling](/guides/schedule)
* Energy [cost calculation](/guides/calculate)