Provider integration development guide
If you are missing FlatPeak direct integration with your favourite energy provider, you can send a request to the FlatPeak team via the form or develop it yourself by following this guide.
Introduction
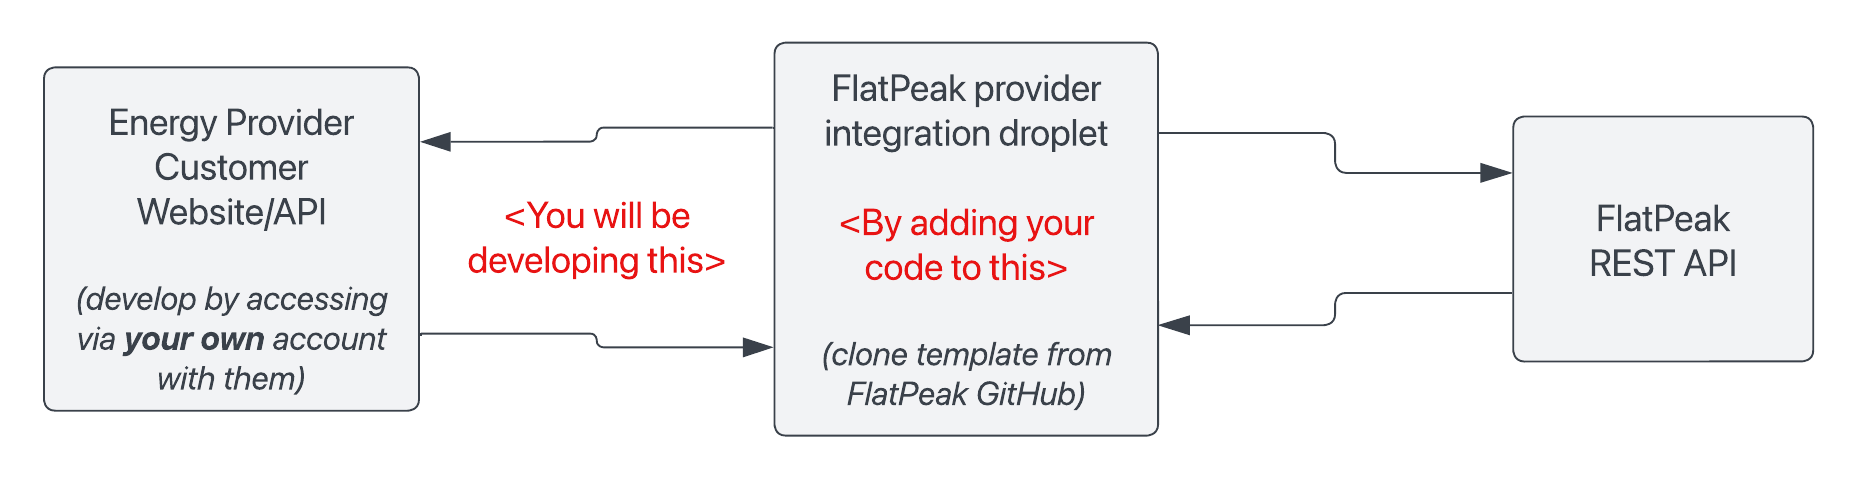
This document explains how to develop a third-party integration with an energy provider that will be pluggable into FlatPeak backend systems. To make it easier to follow the steps below, we presume that you are developing an integration with a provider that supplies your own home or business and will refer to it as “your provider.”
The integration scope is designed to be light and only implements the functionality necessary to obtain access to your account with your energy provider and read your tariff.
Prepare the project
Obtain FlatPeak IDs
Before you can start working on the integration, you need to obtain a FlatPeak ID for your provider. If you cannot find your provider in the list, complete this form.
- Login to Dashboard and go to Integrations > Energy Providers.
- Find your provider in the list, and check that it does not have the
Directlabel. - Make note of its FlatPeak ID and Name.
prv_63a6087272941ef077a8fd3e and PROVIDER_NAME LunarEnergy in this guide.Clone FlatPeak starter package
Clone provider integration starter template from FlatPeak repository on GitHub:
git clone https://github.com/flat-peak/flatpeak-provider-integration-template.git
Prepare your project
Run the following commands to detach your code from the FlatPeak repository, set the required environment variables and install dependencies:
cd flatpeak-provider-integration-template
git remote remove origin # unlink local repo from starter project
cp .env.blank .env # copy vars for your local environment
npm i # install dependencies
Apply FlatPeak IDs
Search project and replace text placeholders:
<PROVIDER_NAME> -> LunarEnergy
<FLATPEAK_ID> -> prv_63a6087272941ef077a8fd3e
Implement integration functions
The scope of FlatPeak provider integration is comprised of three main functions: (1) Obtaining authorisation to access your account with your energy support (authorise), typically via your energy provider’s dashboard; (2) locating your tariff inside the dashboard and capturing it (capture), and; (3) Converting this tariff into FlatPeak format (convert).
You will implement functions in ./modules/provider/index.js:
| Function | Description |
|---|---|
authorise | Validates the username and password that you have captured on views/auth_metadata_capture.hbs page where the login form is located. It shall return the status, error message if it occurred and all additional data that is required to request the tariff, for example, an access_token or cookies. |
capture | Fetches tariff object from the user account with the provider using values returned by the authorise function. The output of this function shall be a tariff object with a unique reference_id for which you can use anything that uniquely identifies the tariff, such as user account identification with the provider. |
convert | Transforms the tariff object received from the capture function into a FlatPeak tariff object, as defined in Tariff element model. |
Console testing
You may find it helpful to run e2e tests as defined in e2e.test.js:
- Insert credentials for your energy provider dashboard to
.envfile:
TEST_CUSTOMER_USER=user@email.com
TEST_CUSTOMER_PASSWORD=password
- Run tests:
npm test
Browser testing
Once integration functions are implemented and you can pass console tests, you shall test user flow in the browser. You will need to obtain a valid token to run FlatPeak Connect. Here is how to do it:
Obtain a token to start Connect session
- Grab
account_idand anyapi_keyfrom API keys page in the Dashboard
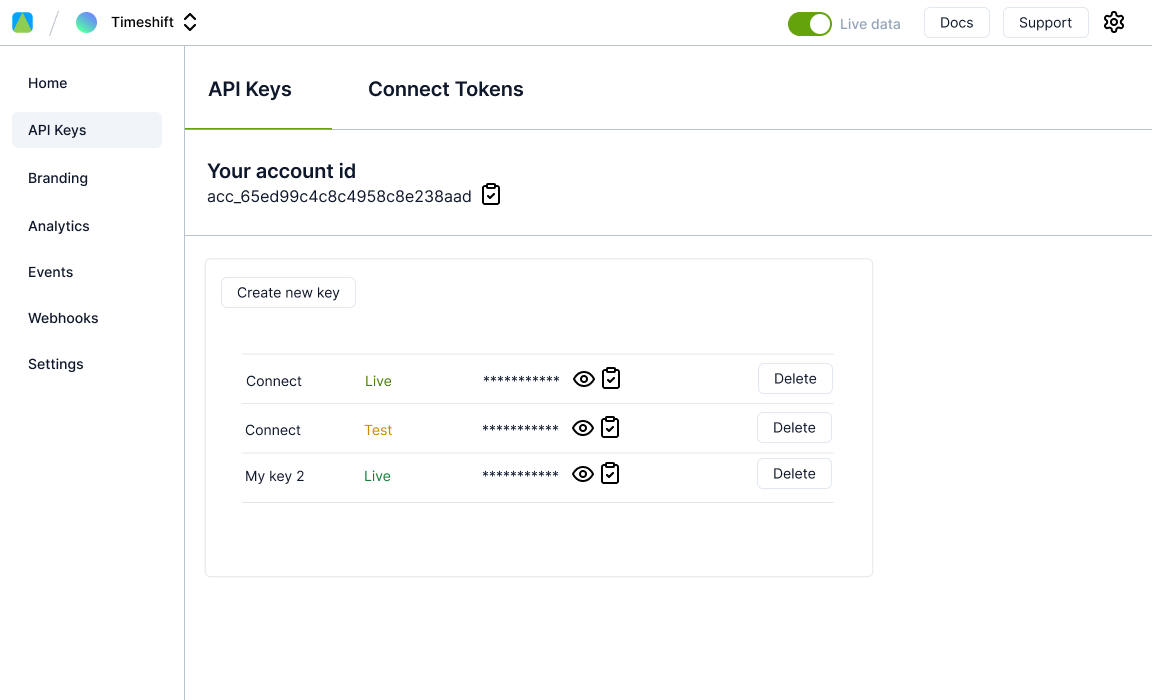
- Create a bearer_token (read more about FlatPeak API authorization here)
- Use
bearer_tokento create a connect_token
callback_uri to any page that can accept callbacks. Our team likes https://webhook.site but you can choose any other service.Bind your provider to Connect session
curl --request POST \
  --url https://connect.flatpeak.com \
  --header 'Content-Type: application/json' \
  --data '{
  "connect_token": "cot_6587fa4362341be5b524de3b",
  "route": "provider_select",
  "data": {
    "provider": {
      "id": "prv_63a6087272941ef077a8fd3e"
    }
  }
}'
Run your application
-
Run
npm start -
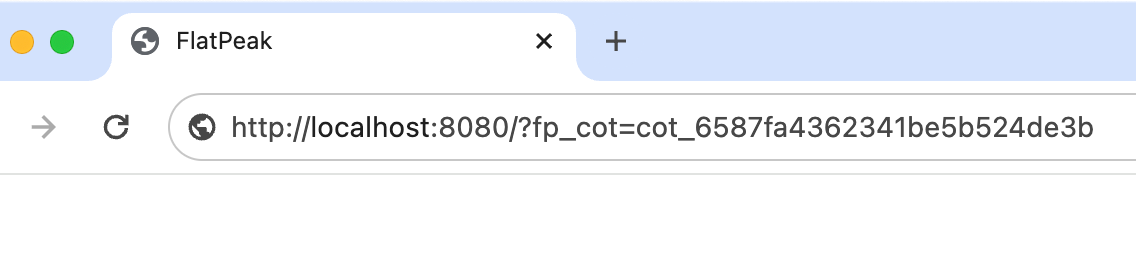
In a browser open: http://localhost:8080/?fp_cot= and append the Connect token you created earlier i.e.:
-
A Login form should be displayed. Submit username and password for your account with your provider.
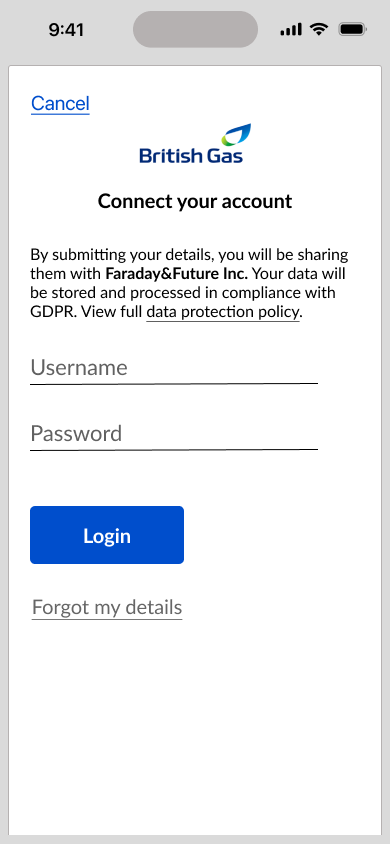
- After you submit the correct login credentials, the Sharing consent form should be displayed.

You have now completed the development of FlatPeak third-party provider integration. Get in touch with FlatPeak support at support@flatpeak.com for next steps.
Was this page helpful?